 Disjoncto


Draw
Installation
Every socket, control, ceiling light or appliance is a point on the plan, drawn with the Belgian layout plan symbol.
Place a symbol#
The Symbols button in the toolbar opens the picker, sorted by family. Choose a symbol, then tap the plan: an amber preview follows the pointer (and the tip of a hovering Apple Pencil). Each tap places a point; the tool stays active until Esc or V.
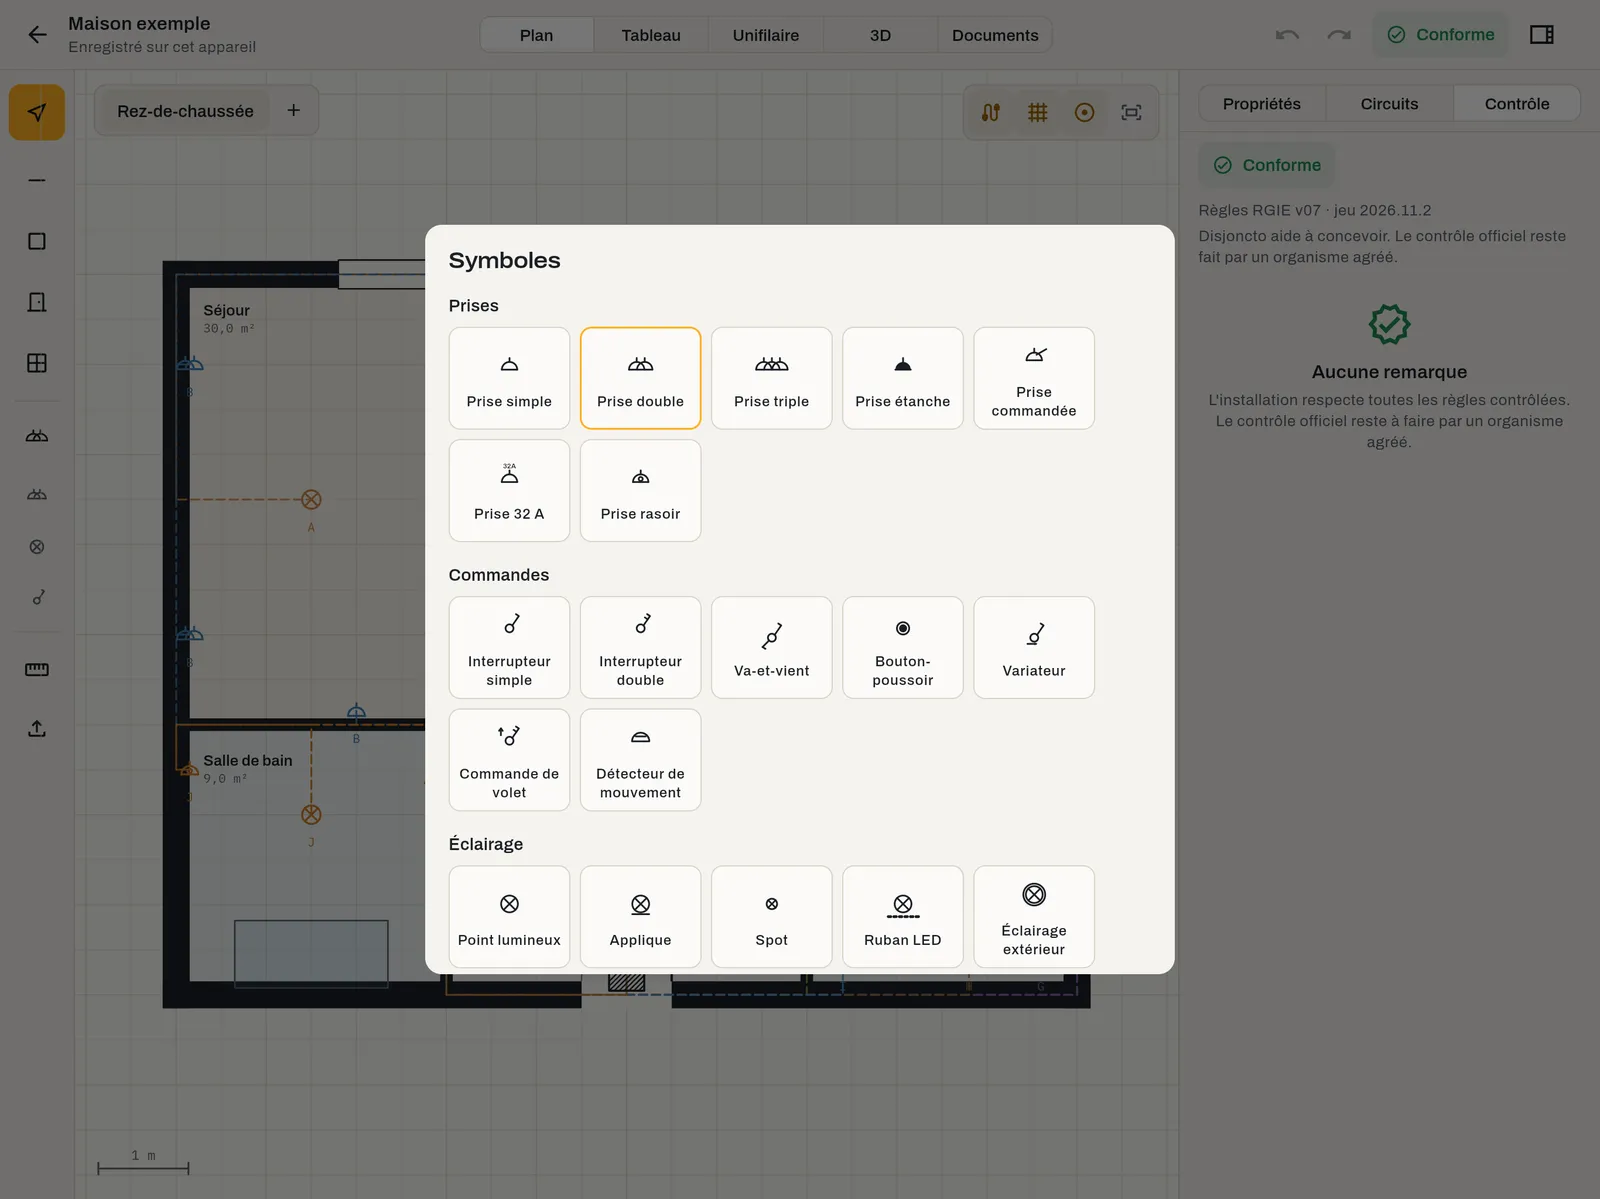
Three symbols have direct access under the Symbols button, and on the keyboard: double socket (P), ceiling light (L) and single switch (I).
Wall snapping#
Near a wall (within 45 cm), sockets, controls, network and TV sockets, wall lights, appliances (except the air conditioner) and the board snap to the face of the wall and rotate to face the room. Ceiling lights, spotlights, LED strips, detectors and the air conditioner are placed freely, on a 5 cm grid. Hold ⌥ (Alt) to place any symbol without snapping.
A point moved on its own re-snaps to the nearest wall. The Rotate 90° button in the panel adjusts the orientation.
List of symbols#
The complete catalogue, with the default height and power offered. Socket powers are the ones used to estimate the load until you enter one yourself (see circuit load).
Sockets#
| Symbol | Default height | Default power | Snaps to wall |
|---|---|---|---|
| Single socket | 0.25 m | 300 W | Yes |
| Double socket | 0.25 m | 2 × 300 W | Yes |
| Triple socket | 0.25 m | 3 × 300 W | Yes |
| Waterproof socket | 0.25 m | 300 W | Yes |
| Switched socket | 0.25 m | 300 W | Yes |
| 32 A socket | 0.25 m | 7 400 W | Yes |
| Shaver socket | 0.25 m | 20 W | Yes |
Controls#
| Symbol | Default height | Default power | Snaps to wall |
|---|---|---|---|
| Single switch | 1.10 m | — | Yes |
| Double switch | 1.10 m | — | Yes |
| Two-way switch | 1.10 m | — | Yes |
| Push button | 1.10 m | — | Yes |
| Dimmer | 1.10 m | — | Yes |
| Shutter switch | 1.10 m | — | Yes |
| Motion detector | 1.10 m | — | Yes |
Lighting#
| Symbol | Default height | Default power | Snaps to wall |
|---|---|---|---|
| Ceiling light | 2.50 m | 60 W | No |
| Wall light | 1.90 m | 40 W | Yes |
| Spotlight | 2.50 m | 7 W | No |
| LED strip | 2.50 m | 30 W | No |
| Outdoor light | 2.50 m | 40 W | No |
Appliances#
| Symbol | Default height | Default power | Snaps to wall |
|---|---|---|---|
| Oven | 0.60 m | 3 500 W | Yes |
| Hob | 0.60 m | 7 400 W | Yes |
| Washing machine | 0.60 m | 2 500 W | Yes |
| Tumble dryer | 0.60 m | 2 500 W | Yes |
| Dishwasher | 0.60 m | 2 200 W | Yes |
| Water heater | 1.80 m | 2 400 W | Yes |
| Air conditioner | 2.20 m | 1 500 W | No |
| Heat pump | 0.60 m | 4 000 W | Yes |
| Ventilation | 0.60 m | 100 W | Yes |
| EV charger | 1.20 m | 7 400 W | Yes |
| Solar inverter | 0.60 m | 4 000 W | Yes |
| Electric heater | 0.60 m | 1 500 W | Yes |
| Shutter motor | 0.60 m | 150 W | Yes |
Extra-low voltage, safety, sanitary#
| Symbol | Default height | Default power | Snaps to wall |
|---|---|---|---|
| RJ45 network socket | 0.25 m | — | Yes |
| TV socket | 0.25 m | — | Yes |
| Smoke detector | 2.50 m | — | No |
| Doorbell | 2.50 m | — | No |
| Board | 1.50 m | — | Yes |
| Bathtub | — | — | No |
| Shower | — | — | No |
The bathtub (1.70 × 0.75 m) and the shower (0.90 × 0.90 m) are not electrical: they define the bathroom zones. Their width and depth are set in the panel.
Properties of a point#
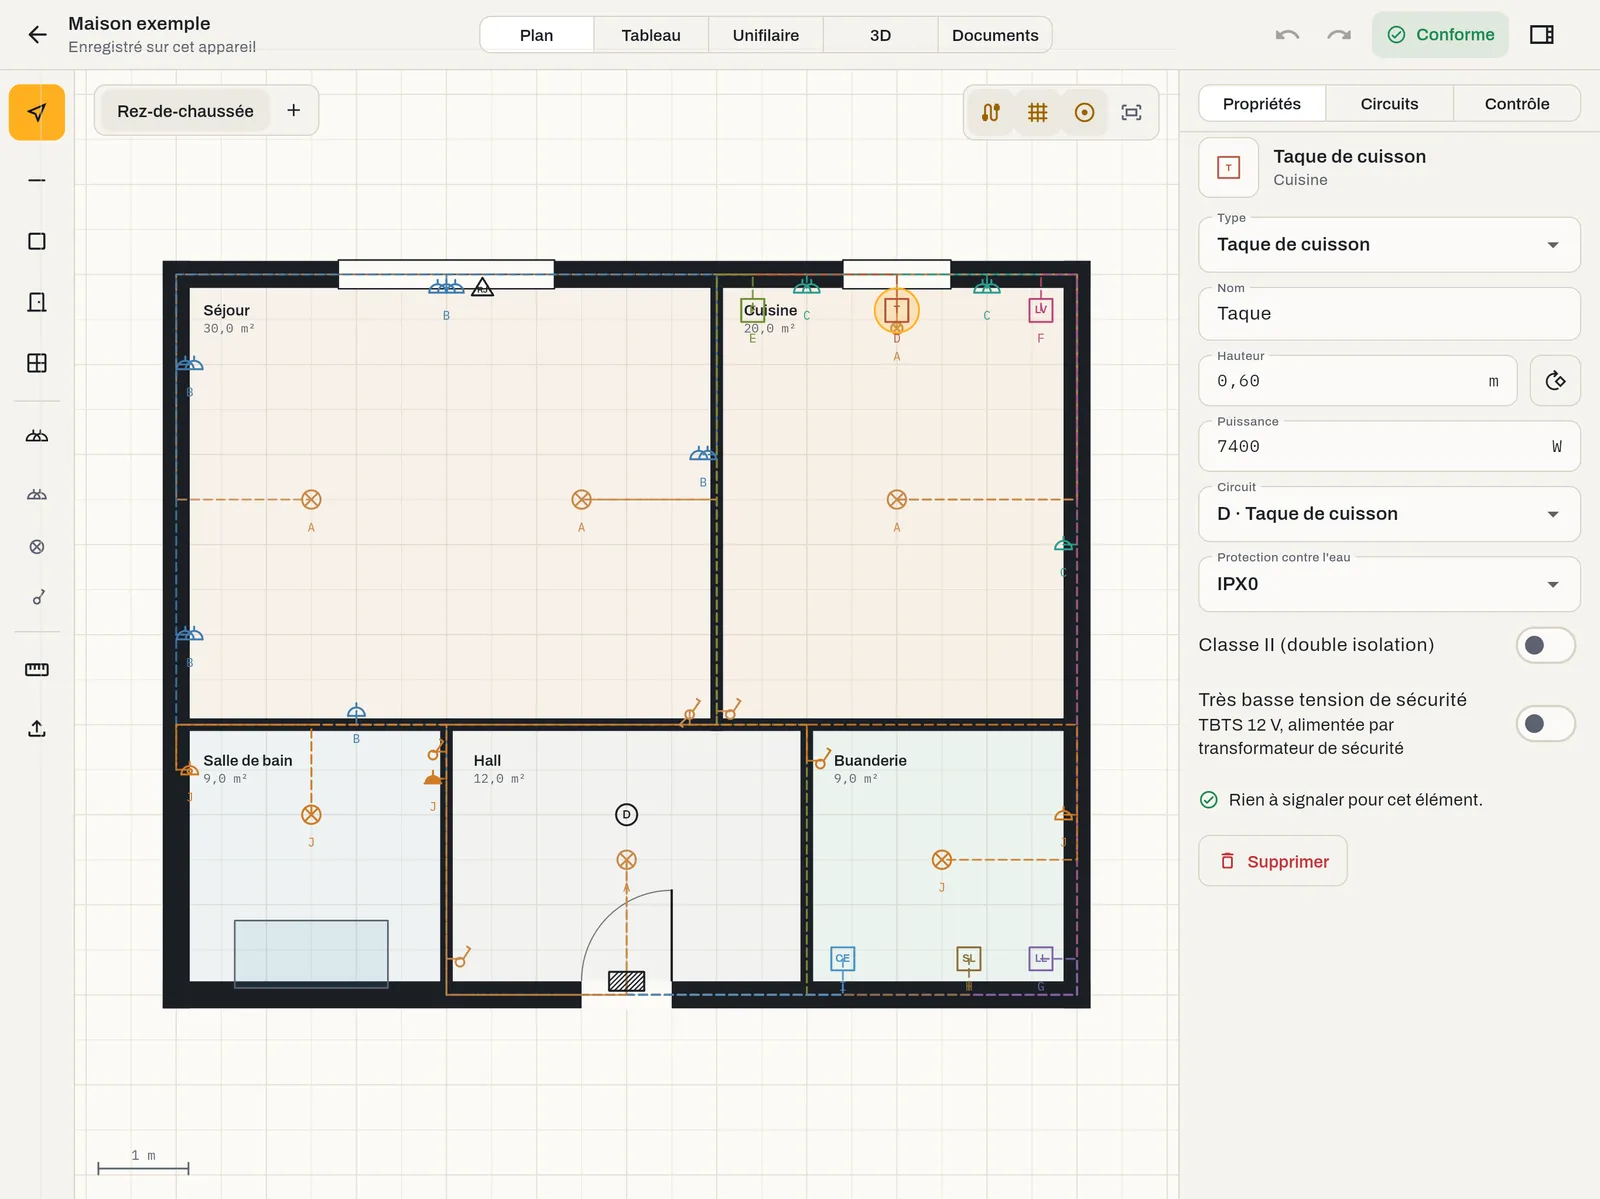
Tap a point to show it in the Properties tab. At the top: the symbol in its circuit colour, the room and, in a wet room, the zone (zone 0, 1, 2 or outside zones). Then:
- Type: switches to another symbol of the same family (for example single socket to double socket).
- Name: label used in remarks and documents.
- Height above the finished floor, in metres, and Rotate 90°.
- Power in watts (points that consume).
- Circuit: No circuit, an existing circuit, or New circuit…, which creates a suitable circuit: 1.5 mm² · 16 A lighting for a ceiling light, 2.5 mm² · 20 A dedicated circuit for an appliance, 2.5 mm² · 20 A sockets otherwise.
- Water protection (IPX0, IPX4, IPX5, IPX7) and Class II for sockets, luminaires and appliances.
- Safety extra-low voltage: SELV 12 V fed by a safety transformer; it lifts the bathroom zone prohibitions.
At the bottom, the check remarks that concern this point, with their fixes, or “Nothing to report for this item”.
Heights#
Each symbol gets a default height (table above): sockets 0.25 m, controls 1.10 m, wall lights 1.90 m, ceiling 2.50 m, water heater 1.80 m, air conditioner 2.20 m, EV charger 1.20 m, board 1.50 m. The height is used for the bathroom zone calculation, the 3D view and routing: a point at 1.20 m or higher is fed from the ceiling, a lower point through a chase 30 cm above the floor.
Control–lighting links#
Select a control (switch, two-way switch, push button, dimmer, detector): the Controls the lights section lists the ceiling lights on the level. Tick those it controls. The links are shown as amber dashed lines when the control or a linked point is selected. During automatic distribution, a control joins the circuit of the points it controls.
Multiple selection#
- ⇧ or ⌘ + tap or click: adds an item to the selection or removes it.
- With the mouse, dragging on empty space draws a rectangle: points and walls entirely inside it are selected.
- ⌘ A selects all points on the level.
With several items, the panel shows their number and offers Assign to circuit (an existing circuit or a new one) and Delete. Selected items move together with a finger, with the mouse, or by 5 cm with the arrow keys.
Duplicate, delete#
⌘ D duplicates the selected points, offset by 30 cm, with the same properties and the same circuit; the copy becomes the selection. ⌫ or the Delete button erases the selection; deleting a wall also deletes its openings. Everything can be undone with ⌘ Z.